Building your own affordable K8s to host a Service Mesh - Part 1
-
Cloud · Service Mesh ·
I want to build a Container-based Cloud to deploy any kind of workload (RESTful API, Microservices, Event-Driven, Functions, etc.) but it should be affordable, ready to use, reliable, secure and productionable. This means:
- Productionable: should be fully functional and ready to be used as a production environment.
- Reliable and Secure: able to improve the security level by implementing more security controls, at least fully isolated secure private networking.
- Affordable: cheaper.
- Ready to use: able to be automated (DevOps and IaC) with a mature management API.
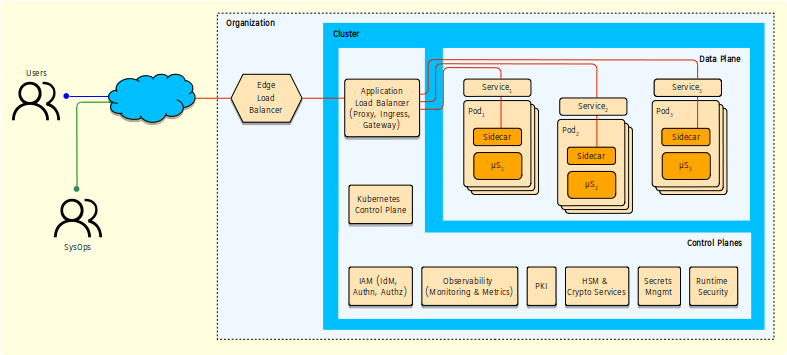
Below a high level architecture of Container-based Cloud I want to get. I will focus on the Service Mesh Data Plane.

These requeriments restric some options, all of them using any Public Cloud Provider, but considering the AWS Spot Instances and Google Cloud Preemptible VM Instances. Unfortunately Microsoft Azure only provides Low-Priority VMs to be used from Azure Batch Service. But if you are new user, you could apply for using the Free Tier in all of 3 Cloud Providers.
For further information, you can read these articles:
- Understanding Excess Cloud Capacity: Amazon EC2 Spot vs. Azure Low-Priority VM vs. Google Preemptible VM vs IBM Transient Servers - By Zev Schonberg, 2019-Mar
- Cloud vendor free tiers compared: AWS vs Azure vs Google Cloud Platform - By Scott Carey, 2018-May
The automation can be achieved using Terraform, Python, Bash, etc. and the 2 Cloud Providers (AWS and Google Cloud) choosen for this project have a mature Management API which can be used to automatization and configuration.
How much will the Kubernetes Cluster cost me?
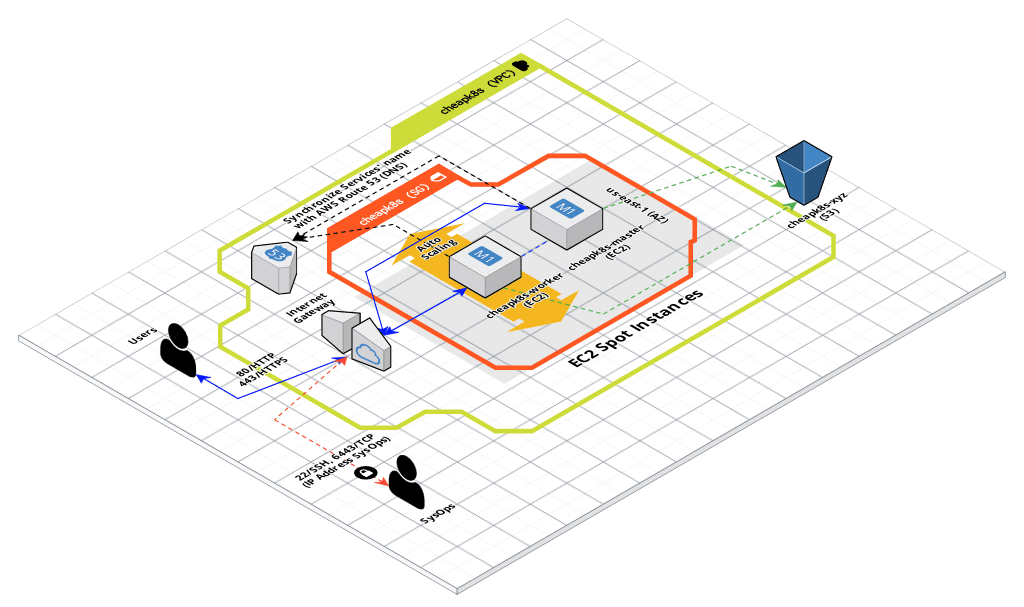
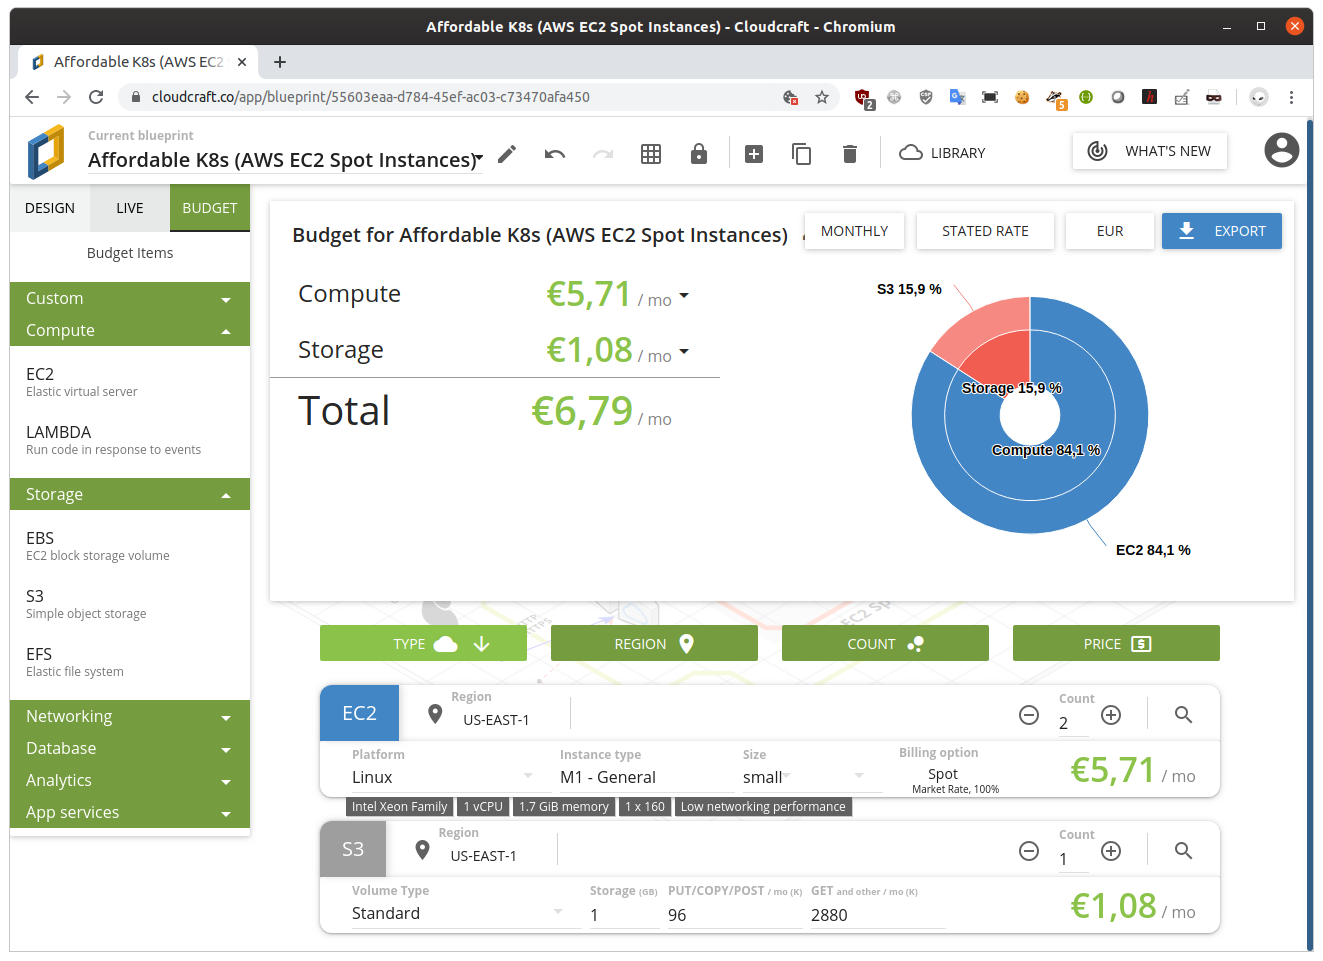
Well, It is too difficult to know the cost exactly right now, however, I can estimate what it will cost me for a month. Below you can see two images, the first one is the High level AWS design and the next one is the approximate cost of the all AWS resources used during a month.
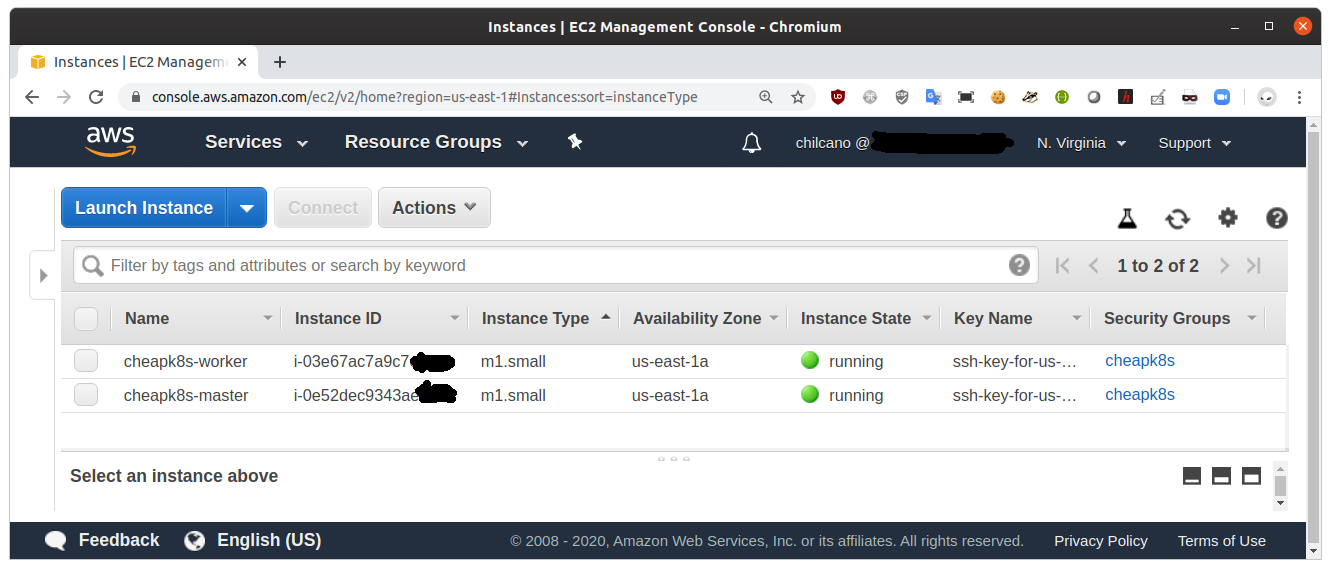
You can see below that my K8s Cluster using AWS Spot instances will cost approx. 6.79 Euros, that includes:
- Instances EC2 Spot: 2
- Type: m1.small
- AZ: us-east-1
- S3 Storage 1GB
- S3 Put/Copy/Post / mo(K): 96
- S3 Get and other / mo(K): 2880
- Backup into S3 cron expression: “*/15 * * * *”
What about Digital Ocean, Hetzner Cloud, Scaleway and other Providers?
Yes, all of them are worthy of being considered too and will do it in next blog posts, but let’s start with AWS and Google first. Ah, if you don’t want to wait, I suggest you read the Kubernetes clusters for the hobbyist guide written by Patrick Stadler. This guide explains how to build a Kubernetes Cluster on Digital Ocean, Hetzner Cloud and/or Scaleway, and this guide is accompanied by a fully automated cluster setup based on Terraform recipes. The guide suggests that Linode, Vultr are other viable options.
If you know a reliable, secure and affordable Cloud Provider, don’t hesitate to drop me a line.
Cheap doesn’t mean unreliable, doesn’t mean unsecure
Choose a cloud provider based on a few criteria such as trustworthiness, reliability, pricing and data center location is critical for this project. Security is a must, create a cluster in a private network doesn’t mean it is secure. I will create multiple clusters to host different kind of workloads, then they should be isolated, implement secure private networking and implement Access Control (Authentication and Authorization).
Let’s do it
Then, in this post I will explain how to create an affordable Data Plane in AWS, to do that I’m going to use the Really cheap Kubernetes cluster on AWS with kubeadm Guide’s Sam Weston which will create a Kubernetes Cluster in AWS by using AWS EC2 Spot Instances, Terraform, Bash and Helm for automation, External DNS and Nginx Ingress as a cheap ELB alternative, and Cert Manager for TLS certificates via Let’s Encrypt. Other features implemented are:
- Automatic backup and recovery.
- Auto Scaling of worker nodes.
- Persistent Volumes using General Purpose SSD (GP2) storage on AWS EBS.
Steps
1) Terraform
1. Download Terraform bundle.
I’ve attempted to use Terraform 12.x, but unfortunately Terraform scrips need to be tweaked before, for that, for this blog post I recommend download and install Terraform 11.15-oci version.
The oci suffix means that Terraform is compatible with Oracle Cloud Infrastructure.
2. Extract the downloaded terraform binary file and move it into a directory searched for executables.
chilcano@inti:~$ unzip ~/Downloads/terraform_0.11.15-oci_linux_amd64.zip

chilcano@inti:~$ sudo mv terraform /usr/local/bin/

chilcano@inti:~$ terraform -v
Terraform v0.11.15-oci
2) AWS (optional)
Although AWS CLI isn’t needed for the purpose of running Terraform, that will be useful in the next blog posts.
- Install AWS CLI. It requires Pip 3.
chilcano@inti:~$ pip3 --version
pip 18.1 from /usr/lib/python3/dist-packages/pip (python 3.7)

chilcano@inti:~$ pip3 install awscli --upgrade --user

chilcano@inti:~$ aws --version
aws-cli/1.16.314 Python/3.7.5 Linux/5.3.0-26-generic botocore/1.13.50

chilcano@inti:~$ which aws
/home/chilcano/.local/bin/aws
- Configure the AWS account.
chilcano@inti:~$ aws configure --profile affordablek8s01
AWS Access Key ID [None]: <ACCESS-KEY-ID>
AWS Secret Access Key [None]: <SECRET-ACCESS-KEY>
Default region name [None]: us-west-2
Default output format [None]: json

chilcano@inti:~$ cat .aws/credentials
[affordablek8s01]
aws_access_key_id = <ACCESS-KEY-ID>
aws_secret_access_key = <SECRET-ACCESS-KEY>
- Create a SSH key under the AZ where the resources will be created. In my case I’ll create in
us-east-1(Virginia) from theAWS Web Console > NETWORK & SECURITY > Key Pairs. This SSH key will be used to get access to all nodes created in AWS for that specific AZ.
3) Create the Kubernetes Cluster in AWS using Terraform
- Clone the Github repo.
You can clone the forked GitHub repo and switch to 0.2.1-chilcano branch.
chilcano@inti:~/git-repos$ git clone https://github.com/chilcano/kubeadm-aws affordable-k8s-tf

Cloning into 'affordable-k8s-tf'...
remote: Enumerating objects: 327, done.
remote: Total 327 (delta 0), reused 0 (delta 0), pack-reused 327
Receiving objects: 100% (327/327), 71.68 KiB | 638.00 KiB/s, done.
Resolving deltas: 100% (210/210), done.

chilcano@inti:~/git-repos$ cd affordable-k8s-tf/

chilcano@inti:~/git-repos/affordable-k8s-tf$ git tag -l
0.1.0
0.1.1
0.1.2
0.2.0
0.2.1

chilcano@inti:~/git-repos/affordable-k8s-tf$ git branch -a
* master
   remotes/origin/0.2.1-chilcano
   remotes/origin/HEAD -> origin/master
   remotes/origin/master

chilcano@inti:~/git-repos/affordable-k8s-tf$ git branch -r
   origin/0.2.1-chilcano
   origin/HEAD -> origin/master
   origin/master
Now, let’s switch to 0.2.1-chilcano branch.
chilcano@inti:~/git-repos/affordable-k8s-tf$ git checkout 0.2.1-chilcano
Branch '0.2.1-chilcano' set up to track remote branch '0.2.1-chilcano' from 'origin'.
Switched to a new branch '0.2.1-chilcano'

chilcano@inti:~/git-repos/affordable-k8s-tf$ git status
On branch 0.2.1-chilcano
Your branch is up to date with 'origin/0.2.1-chilcano'.

nothing to commit, working tree clean
Alternatively to all above steps you can clone the 0.2.1-chilcano branch only of GitHub repo as follow:
chilcano@inti:~/git-repos$ git clone --single-branch --branch 0.2.1-chilcano https://github.com/chilcano/kubeadm-aws affordable-k8s-tf
- Update
variables.tf.
Hard-coding any credentials into any Terraform configuration is not recommended. I recommend to provide your AWS credentials via AWS_ACCESS_KEY_ID and AWS_SECRET_ACCESS_KEY environment variables.
$ export AWS_ACCESS_KEY_ID="an-access-key"
$ export AWS_SECRET_ACCESS_KEY="a-secret-key"
In my case I’m not going to update any variables in variables.tf, I will overwrite them when running terraform apply. But if you want to do, the variables you have to modify are:
cluster-name = "MY-CHEAP-K8S"access_key = "ENV-VAR-VALUE-WILL-BE-READ"secret_key = "ENV-VAR-VALUE-WILL-BE-READ"k8s-ssh-key = "SSH-KEY-NAME-CREATED-IN-AWS-CONSOLE"admin-cidr-blocks = "YOUR-PUBLIC-IP-ADDRESS/32"region = "us-east-1"master-instance-type = "m1.small"worker-instance-type = "m1.small"
If you change the master-instance-type and worker-instance-type values to t2.micro for example, that isn’t going to work because the t2.micro AMIs are prepared to be autoscaled.
- Update
main.tfand initialize the Terraform Providers.
I will update main.tf to configure the 2 Terraform providers (aws and random) with proper versions according Terraform v0.11.15-oci version:
provider "aws" {
   #version    = "~> 1.48"
   version    = "~> 2.44.0"
   access_key = "${var.access_key}"
   secret_key = "${var.secret_key}"
   region     = "${var.region}"
}

provider "template" {
   version    = "1.0.0"
}

provider "random" {
   #version    = "2.0.0"
   version    = "2.1.0"
}
Now, initialize Terraform.
chilcano@inti:~/git-repos/affordable-k8s-tf$ terraform init

Initializing provider plugins...
- Checking for available provider plugins on https://releases.hashicorp.com...
- Downloading plugin for provider "template" (1.0.0)...
- Downloading plugin for provider "random" (2.1.0)...
- Downloading plugin for provider "aws" (2.44.0)...

Terraform has been successfully initialized!

You may now begin working with Terraform. Try running "terraform plan" to see
any changes that are required for your infrastructure. All Terraform commands
should now work.

If you ever set or change modules or backend configuration for Terraform,
rerun this command to reinitialize your working directory. If you forget, other
commands will detect it and remind you to do so if necessary.
- Get the Terraform Plan.
chilcano@inti:~/git-repos/affordable-k8s-tf$ terraform plan \
   -var cluster-name="cheapk8s" \
   -var k8s-ssh-key="ssh-key-for-us-east-1" \
   -var admin-cidr-blocks="83.46.128.76/32" \
   -var region="us-east-1" \
   -var kubernetes-version="1.14.3"

chilcano@inti:~/git-repos/affordable-k8s-tf$ terraform -v
Terraform v0.11.15-oci
+ provider.aws v2.44.0
+ provider.random v2.1.0
+ provider.template v1.0.0

Your version of Terraform is out of date! The latest version
is 0.12.19. You can update by downloading from www.terraform.io/downloads.html
- Visual exploration of the AWS resources are going to be created by Terraform.
Terraform is able to export all Terraform scripts into a file in DOT format, useful to generate a graph through GraphViz. All details are explained here “Terraform - Command: graph”.
chilcano@inti:~/git-repos/affordable-k8s-tf$ sudo apt install graphviz
terraform graph | dot -Tsvg > your-graph.svg
In my case I’m going to tweaking the DOT file to get a better graph. In fact, you can do it and once done, using an online service like this Graphviz Online generate SVG file.
chilcano@inti:~/git-repos/affordable-k8s-tf$ terraform graph -draw-cycles -module-depth=1 -type=apply > 20200116-service-mesh-02-affordable-k8s-aws-graph.dot
You can download my updated DOT file from here 20200116-service-mesh-02-affordable-k8s-aws-graph.dot.
- Apply the Terraform Plan.
chilcano@inti:~/git-repos/affordable-k8s-tf$ terraform apply \
   -var cluster-name="cheapk8s" \
   -var k8s-ssh-key="ssh-key-for-us-east-1" \
   -var admin-cidr-blocks="83.46.128.76/32" \
   -var region="us-east-1" \
   -var kubernetes-version="1.14.3"
And if you want to destroy all resources recently created by terraform apply, you can do it executing this:
chilcano@inti:~/git-repos/affordable-k8s-tf$ terraform destroy \
   -var cluster-name="cheapk8s" \
   -var k8s-ssh-key="ssh-key-for-us-east-1" \
   -var admin-cidr-blocks="83.46.128.76/32" \
   -var region="us-east-1" \
   -var kubernetes-version="1.14.3"
4) Check the Kubernetes Cluster
If we want to check the Kubernetes Cluster creation, we have to review the /var/log/cloud-init-output.log. Before we should get remote access to Kubernetes Master host.
chilcano@inti:~/git-repos/affordable-k8s-tf$ chmod 400 ~/Downloads/ssh-key-for-us-east-1.pem
Now, getting remote access to Kubernetes Master host.
chilcano@inti:~/git-repos/affordable-k8s-tf$ ssh ubuntu@$(terraform output master_dns) -i ~/Downloads/ssh-key-for-us-east-1.pem -- cat /var/log/cloud-init-output.log

[...]
Completed 1.0 KiB/1.0 KiB (6.9 KiB/s) with 1 file(s) remaining
upload: etc/kubernetes/pki/ca.crt to s3://cheapk8s20200115152212812700000001/pki/i-9343ae2e5c0e52dec/ca.crt
Completed 1.6 KiB/1.6 KiB (12.5 KiB/s) with 1 file(s) remaining
upload: etc/kubernetes/pki/ca.key to s3://cheapk8s20200115152212812700000001/pki/i-9343ae2e5c0e52dec/ca.key
Created symlink /etc/systemd/system/multi-user.target.wants/check-termination.service → /etc/systemd/system/check-termination.service.
Cloud-init v. 19.3-41-gc4735dd3-0ubuntu1~18.04.1 running 'modules:final' at Wed, 15 Jan 2020 15:24:48 +0000. Up 81.04 seconds.
Cloud-init v. 19.3-41-gc4735dd3-0ubuntu1~18.04.1 finished at Wed, 15 Jan 2020 15:33:22 +0000. Datasource DataSourceEc2Local.  Up 594.92 seconds
If you see above logs, that means that likely everything worked and Kubernetes Cluster was created successfully.
But, if you see below logs, that means Kubernetes Cluster wasn’t created. In the below logs there are errors about Kubernetes packages (kubeadm, kubelet and kubernetes-cni) dependencies unmet when using kubernetes-version="1.13.4" (default version of these Terraform scripts). To fix it we should change it to kubernetes-version="1.14.3".
ubuntu@ip-10-0-100-4:~$ cat /var/log/cloud-init-output.log

[...]
Some packages could not be installed. This may mean that you have
requested an impossible situation or if you are using the unstable
distribution that some required packages have not yet been created
or been moved out of Incoming.
The following information may help to resolve the situation:

The following packages have unmet dependencies:
 kubeadm : Depends: kubernetes-cni (= 0.6.0) but 0.7.5-00 is to be installed
 kubelet : Depends: kubernetes-cni (= 0.6.0) but 0.7.5-00 is to be installed
E: Unable to correct problems, you have held broken packages.
Cloud-init v. 19.3-41-gc4735dd3-0ubuntu1~18.04.1 running 'modules:final' at Wed, 15 Jan 2020 11:15:47 +0000. Up 88.84 seconds.
2020-01-15 11:16:17,468 - util.py[WARNING]: Failed running /var/lib/cloud/instance/scripts/part-001 [100]
2020-01-15 11:16:17,486 - cc_scripts_user.py[WARNING]: Failed to run module scripts-user (scripts in /var/lib/cloud/instance/scripts)
2020-01-15 11:16:17,486 - util.py[WARNING]: Running module scripts-user (<module 'cloudinit.config.cc_scripts_user' from '/usr/lib/python3/dist-packages/cloudinit/config/cc_scripts_user.py'>) failed
Cloud-init v. 19.3-41-gc4735dd3-0ubuntu1~18.04.1 finished at Wed, 15 Jan 2020 11:16:18 +0000. Datasource DataSourceEc2Local.  Up 119.65 seconds
The below log shows other error related with incompatible apiVersion in init-config.yaml file created by master.sh.
It shoud be changed to apiVersion: kubeadm.k8s.io/v1beta1.
ubuntu@ip-10-0-100-4:~$ cat /var/log/cloud-init-output.log

[...]
else
  echo "Running kubeadm init"
  kubeadm init --config=init-config.yaml --ignore-preflight-errors=NumCPU
  touch /tmp/fresh-cluster
fi
Running kubeadm init
your configuration file uses a deprecated API spec: "kubeadm.k8s.io/v1alpha3". Please use 'kubeadm config migrate --old-config old.yaml --new-config new.yaml', which will write the new, similar spec using a newer API version.
Cloud-init v. 19.3-41-gc4735dd3-0ubuntu1~18.04.1 running 'modules:final' at Wed, 15 Jan 2020 12:05:30 +0000. Up 78.18 seconds.
2020-01-15 12:10:10,299 - util.py[WARNING]: Failed running /var/lib/cloud/instance/scripts/part-001 [1]
2020-01-15 12:10:10,308 - cc_scripts_user.py[WARNING]: Failed to run module scripts-user (scripts in /var/lib/cloud/instance/scripts)
2020-01-15 12:10:10,308 - util.py[WARNING]: Running module scripts-user (<module 'cloudinit.config.cc_scripts_user' from '/usr/lib/python3/dist-packages/cloudinit/config/cc_scripts_user.py'>) failed
Cloud-init v. 19.3-41-gc4735dd3-0ubuntu1~18.04.1 finished at Wed, 15 Jan 2020 12:10:10 +0000. Datasource DataSourceEc2Local.  Up 357.91 seconds
5) Access to Kubernetes Cluster
If you want to know if your Kubernetes Cluster was created successfully, then you should do these checkings:
- Check that there are no errors in
/var/log/cloud-init-output.loglog file.
chilcano@inti:~/git-repos/affordable-k8s-tf$ ssh ubuntu@$(terraform output master_dns) -i ~/Downloads/ssh-key-for-us-east-1.pem -- cat /var/log/cloud-init-output.log
- Check that
kubelethas started successfully.
chilcano@inti:~/git-repos/affordable-k8s-tf$ ssh ubuntu@$(terraform output master_dns) -i ~/Downloads/ssh-key-for-us-east-1.pem -- systemctl status kubelet
- Finally, ask to Kubernetes to show all Cluster Nodes and its status.
chilcano@inti:~/git-repos/affordable-k8s-tf$ ssh ubuntu@$(terraform output master_dns) -i ~/Downloads/ssh-key-for-us-east-1.pem -- kubectl get nodes

NAME                           STATUS   ROLES    AGE   VERSION
ip-10-0-100-154.ec2.internal   Ready    <none>   48m   v1.14.3
ip-10-0-100-4.ec2.internal     Ready    master   49m   v1.14.3

chilcano@inti:~/git-repos/affordable-k8s-tf$ ssh ubuntu@$(terraform output master_dns) -i ~/Downloads/ssh-key-for-us-east-1.pem -- kubectl cluster-info
Kubernetes master is running at https://10.0.100.4:6443
KubeDNS is running at https://10.0.100.4:6443/api/v1/namespaces/kube-system/services/kube-dns:dns/proxy

If you want a cheap K8s Infrastructure on AWS, I recommend to use this GitHub repo I’ve updated for you, once cloned just follow the above steps. https://github.com/chilcano/kubeadm-aws/tree/0.2.1-chilcano
Below I’ve selected a set of good references to read related to this article and that will surely interest you. I hope this helps.
References
- Kubernetes: The Surprisingly Affordable Platform for Personal Projects By Caleb Doxsey - Sep 30, 2018
- Affordable Kubernetes Cluster By Remko Seelig - March 12, 2019
- Kubernetes clusters for the hobbyist By Patrick Stadler - Latest commit on Oct 11, 2019
- Kubernetes on the cheap By Daniel Watrous - Feb 9, 2019
- Kubernetes for poor - How to run your cluster and not go bankrupt By Aleksander Grzybowski - Nov 13, 2018
- Diary of a GKE Journeyman - Running your personal Kubernetes Cluster for (almost) free on GKE By Mehdi El Gueddari - Mar 22, 2019
- Collection of tools and code examples to demonstrate best practices in using Amazon EC2 Spot Instances.
- AWS Spot Instance Advisor
Kubernetes’ distributions
- MicroK8s - Zero-ops Kubernetes for workstations and edge / IoT By Ubuntu
- K3s - Lightweight Kubernetes for IoT & Edge computing By Rancher
- KinD - Kubernetes in Docker By Kubernetes SIGs
- Typhoon - Minimal and free Kubernetes distribution By poseidon


